Pairing Jung Zigbee Transmitter to Philips Hue LED lights (flashing red)
I had a problem with the transmitter not being added to the network and my Philips Hue LED bulbs would not pair with the transmitter.
You set the Philips Hue Hub in search-mode using the Hue app.
Go to Settings, Light Setup, Add Lights and hit Search.
Your LED bulbs flash green once, after the transmitter has been added to the network.
Remember that the transmitter will not be shown in the app as a light or accessore.
Hold the transmitter close to the bulb (10-40 cm).
Adding the transmitter
When adding the transmitter fails (red leds flash three times), make sure the Philips hub is in search-mode.You set the Philips Hue Hub in search-mode using the Hue app.
Go to Settings, Light Setup, Add Lights and hit Search.
Your LED bulbs flash green once, after the transmitter has been added to the network.
Remember that the transmitter will not be shown in the app as a light or accessore.
Adding a Hue Bulb to the transmitter
When adding a Hue LED bulb fails (red leds on transmitter flash three times), take the power of the bulb (by either unscrewing or using the wall switch) and try again. Unscrew other bulbs to make sure you're pairing the correct one.Hold the transmitter close to the bulb (10-40 cm).
PowerShell script to move and rename new episodes to specific folders
You can set up qBittorrent's RSS-downloader to automatically download your favorite series. Kodi is a media center platform that uses info from TheTVDB.com to organize your media in a library and provide meta-data (such as ratings, summaries and artwork). To scan and parse the correct movies and episode precise file naming is essential. This takes time and that's where this script comes in.
This script will automatically move and rename downloaded files based on TheTVDB.com episode names to your library location, so you can let Kodi scan these files so you will have the right meta-data in your library.
PowerMove fills the gap between Bittorrent and Kodi and is a simple PowerShell alternative to some of the rename tools on this page.
To fully automate your downloads you can use:
Basically it's Build-your-own-Netflix.
1. Download and install qBittorrent.
2. Configure qBittorrent to put incomplete downloads in one (sub)folder (e.g. C:\Downloads\_incomplete) and move them to a different folder when they are complete (e.g. C:\Downloads\). This is so PowerMove can scan a single directory that will only contain completely downloaded files.
3. Configure qBittorent to automatically download shows you like. You can find RSS feeds on your favorite websites.
If you need more help, there are plenty of online guides available for this part.
Now that your favorite shows are automatically downloaded to this folder, we can proceed to the following step.
2. Copy the PowerMove.ps1 and Series.csv to a suitable location (e.g. C:\Scripts\PowerMove\)
3. Open PowerMove.ps1 and modify the variable $DownloadsDirectory to match the directory that contains your downloads. (E.g.: $DownloadsDirectory = "C:\Downloads\")
4. Open and modify Series.csv (best to use Notepad). You can add lines for any show you want to move to your library.
Leave the first line (header) intact.
Each line should follow this format (same as header): Name,Pattern,Path,SeriesID
Put double quotes when spaces are included, or do so anyway.
E.g.: "My Show","My.Show*","D:\Series\My Show (1997)",123456
Name: Name of the Show
Pattern: Pattern the file name adheres to so it can be recognized as this particular show.
Path: Directory of file share to move the file to.
SeriesID: You can find the SeriesID for any series on TheTVDB.com.
The file will be renamed to the following format: <Name> - SXXEXX - <Episode Name>.<Ext>

This script will automatically move and rename downloaded files based on TheTVDB.com episode names to your library location, so you can let Kodi scan these files so you will have the right meta-data in your library.
PowerMove fills the gap between Bittorrent and Kodi and is a simple PowerShell alternative to some of the rename tools on this page.
To fully automate your downloads you can use:
- qBittorrent
- PowerMove
- Kodi
Basically it's Build-your-own-Netflix.
1. Install and configure qBitTorrent
... or use another client you prefer. Instructions go by qBitTorrent though.1. Download and install qBittorrent.
2. Configure qBittorrent to put incomplete downloads in one (sub)folder (e.g. C:\Downloads\_incomplete) and move them to a different folder when they are complete (e.g. C:\Downloads\). This is so PowerMove can scan a single directory that will only contain completely downloaded files.
 |
| qBittorrent Options - Default Save Path / Keep incomplete torrents in: |
3. Configure qBittorent to automatically download shows you like. You can find RSS feeds on your favorite websites.
 |
| Example of qBittorrent RSS-downloader configuration |
If you need more help, there are plenty of online guides available for this part.
Now that your favorite shows are automatically downloaded to this folder, we can proceed to the following step.
2. Install and Configure PowerMove.ps1
1. Download PowerMove.2. Copy the PowerMove.ps1 and Series.csv to a suitable location (e.g. C:\Scripts\PowerMove\)
3. Open PowerMove.ps1 and modify the variable $DownloadsDirectory to match the directory that contains your downloads. (E.g.: $DownloadsDirectory = "C:\Downloads\")
4. Open and modify Series.csv (best to use Notepad). You can add lines for any show you want to move to your library.
Leave the first line (header) intact.
Each line should follow this format (same as header): Name,Pattern,Path,SeriesID
Put double quotes when spaces are included, or do so anyway.
E.g.: "My Show","My.Show*","D:\Series\My Show (1997)",123456
Name: Name of the Show
Pattern: Pattern the file name adheres to so it can be recognized as this particular show.
Path: Directory of file share to move the file to.
SeriesID: You can find the SeriesID for any series on TheTVDB.com.
The file will be renamed to the following format: <Name> - SXXEXX - <Episode Name>.<Ext>
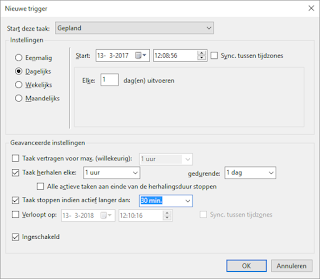
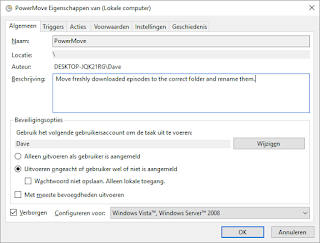
2a. Schedule PowerMove.ps1 (Optional)
You can either run the script manually or schedule it using Windows Task Scheduler.
Make sure your system allows for the running of PowerShell scripts. Set your execution policy using the Set-ExecutionPolicy command. Read this page for more info.
Warning: if you use network drives as a download location or a library location, please make sure you specify the full UNC network path (e.g. \\server\media\video\) and NOT a drive letter. Drive mappings are not available when a user is not logged on.
Action: Start program
Program/script: powershell.exe
Parameters: -ExecutionPolicy Bypass -File "C:\Scripts\PowerMove\PowerMove.ps1"

Bulk Merge SRT into MKV using mkvmerge and PowerShell
Say, you have about 160 mkv files with a 160 seperate subtitles. Matroska is a container format which can hold multiple content such as video, chapters, subtitles and audio tracks. So it's much neater to have a single file for each film or episode.
Doing this manually, even using the mkvmerge job queue, is mind numbing and can take hours. Here's a relatively quick way of automatizing this.


This is the command line you need to run in bulk with slightly different parameters, being the input and output files.
$directory = "M:\Downloads\Prison Break"
Download MergeMKVSRT.ps1.
Doing this manually, even using the mkvmerge job queue, is mind numbing and can take hours. Here's a relatively quick way of automatizing this.
Old situation
New situation
Prerequisite
Download and install MKVToolNix.Part 1
- Load the first mkv file and the srt file into mkvmerge GUI.
- Set the options as desired.
- Click Muxing.
- Click Show the command line.
- Modify the $mkvmergecommand variable in the PowerShell script below to math the parameters in the Current command line.
This is the command line you need to run in bulk with slightly different parameters, being the input and output files.
Part 2
- Modify the variables at the top of the script to reflect your situation.
- Run the script.
$directory = "M:\Downloads\Prison Break"
$mkvmergecommand =
[String]"""""C:\Program
Files\MKVToolNix\mkvmerge.exe"" -o
""%outputfile%""
""--forced-track"" ""0:no""
""-s"" ""0"" ""-D""
""-A"" ""-T""
""--no-global-tags"" ""--no-chapters""
""("" ""%srtinputfile%""
"")"" ""--language""
""0:eng"" ""--default-track""
""0:yes"" ""--forced-track"" ""0:no""
""--display-dimensions"" ""0:1280x720""
""--language"" ""1:eng""
""--default-track"" ""1:yes""
""--forced-track"" ""1:no""
""-a"" ""1"" ""-d""
""0"" ""-S"" ""-T""
""--no-global-tags"" ""--no-chapters""
""("" ""%mkvinputfile%""
"")"" ""--track-order""
""0:0,1:0,1:1"""""
$files =
Get-ChildItem $directory
-Filter "*.mkv"
| Sort Name
Foreach ($file
in $files)
{
$mkvinputfile = ($directory
-replace "\\", "\\")
+ "\\"
+ ($file.Name)
$srtinputfile = ($directory
-replace "\\", "\\")
+ "\\"
+($file.Name -replace
".mkv",
".srt")
$outputfile = ($directory -replace
"\\",
"\\") +
"\\" +($file.Name -replace ".mkv", "Merged.mkv")
$mergecommand = (($mkvmergecommand
-replace "%outputfile%", $outputfile)
-replace "%mkvinputfile%", $mkvinputfile)
-replace "%srtinputfile%", $srtinputfile
cmd
/c $mergecommand
}
Download MergeMKVSRT.ps1.
Set Automatic Individual Corporate Outlook Web App (OWA) Signatures in Exchange Online / Office 365 with PowerShell
An e-mail signature is part of your corporate branding. Having a professional, uniform e-mail signature across your organization increases recognizability, allows clients to quickly find contact information and allows your business to use it as a spot for advertising.
Requesting employees in a large organization to create and design similar signatures is nearly impossible. Check out this crazy before-picture of the situation in our health care organization. Complete with blue handwriting fonts and Comic Sans. Lovely. Fortunately there are software tools available, such as RES Workspace Manager, to set a default, corporate signature in Outlook, but these tools only support the full version of Outlook. As businesses are moving to the cloud, more and more applications, including Outlook, will be offered web-based only.
The larger part of our employees are kiosk users, who have access to Outlook Web App (OWA) only, as a component of Office 365. We would still like to prevent a signature mess like before and preconfigure uniform, corporate signatures.
PowerShell to the rescue! With PowerShell you can connect to Exchange Online using an administrative or service account and set OWA signatures. I've written a script that sets a template signature for everybody and also inputs their individual contact information by replacing specific variables in the HTML code, such as %DisplayName%, %Title%, %Phone% and so on, with the values from the appropriate Active Directory User Attributes.
Note: by design this script only sets automated signatures for users who have never set a signature before or who have cleared their signature. See "Final Remarks" for other options.


Requesting employees in a large organization to create and design similar signatures is nearly impossible. Check out this crazy before-picture of the situation in our health care organization. Complete with blue handwriting fonts and Comic Sans. Lovely. Fortunately there are software tools available, such as RES Workspace Manager, to set a default, corporate signature in Outlook, but these tools only support the full version of Outlook. As businesses are moving to the cloud, more and more applications, including Outlook, will be offered web-based only.
 |
| Automatic e-mail signature in Outlook 2013 generated by RES Workspace Manager |
The larger part of our employees are kiosk users, who have access to Outlook Web App (OWA) only, as a component of Office 365. We would still like to prevent a signature mess like before and preconfigure uniform, corporate signatures.
PowerShell to the rescue! With PowerShell you can connect to Exchange Online using an administrative or service account and set OWA signatures. I've written a script that sets a template signature for everybody and also inputs their individual contact information by replacing specific variables in the HTML code, such as %DisplayName%, %Title%, %Phone% and so on, with the values from the appropriate Active Directory User Attributes.
Note: by design this script only sets automated signatures for users who have never set a signature before or who have cleared their signature. See "Final Remarks" for other options.
Instructions
- Download and extract SetOWASignatures.zip. Here's a link to view the code.
- Open SetOWASignatures.ps1 and replace "admin@<company>.onmicrosoft.com" with your Office 365/Exchange Online admin account.
- Securely save your password in an encrypted format in Password.txt in the root directory of the script. This is required to run the script without user interaction. You can use the following PowerShell command to generate the Password file:Read-Host -AsSecureString | ConvertFrom-SecureString | Out-File "<path to root of script>\Password.txt"Verify that your directory security is set up correctly.
- Modify Signature.html to reflect your brand. The variables %DisplayName%, %Title%, %Phone% and so on, will be automatically replaced by the script with the appropriate Active Directory User Attributes.
- Run the script (it will not modify existing signatures as only unset or cleared signatures will be set).
 |
| Automatic email signature in Outlook Web App (OWA) in Office 365. |
(Optional) Schedule the script to run periodically
You can schedule this script using Task Scheduler to run periodically on any Windows Server in your infrastructure. This way new users and users who have cleared their signature will automatically receive the preconfigured company signature.Final Remarks
- If you want to use images, such as logo's, in your signature, use absolute URL's which are publically accessible.
- Minor alternations to the Where-Object block of the script can change the way it functions. E.g.: reset all user signatures, even those already set previously, or set signatures in which users entered a specific string, such as <insert_signature>, and so on. If you would like to extend or modify the functionality of the script in such a manner but don't know how, please don't hesitate to leave a comment.
Dutch Language Pack for Citrix StoreFront 2.5

Below you will find a Dutch Language Pack for Citrix StoreFront 2.5.
The translation for Citrix StoreFront 2.5 contains more than 20 additional strings in comparison to its predecessor, mostly related to added functionalities such as Single Sign-On (SSO) and the use of smart cards.
Get App-V 5.0 Command Line Hook Switch with PowerShell
The App-V 5.0 Command Line Hook Switch can be used to allow local applications to run inside an App-V Virtual Environment. This way packaged applications, such as a sequenced browser plug-in, can interact with locally installed applications, such as Internet Explorer.
Assembling the Command Line Hook Switch can be tricky because it requires you to retrieve the package GUID and version GUID and concatenate them with an underscore in between. The full format looks like this: /appvve:<PACKAGEGUID_VERSIONGUID>.
To do this quickly, you can copy and run this single line of Powershell code:
Copy the last line of the output and add it as a parameter to your application shortcut.
For more information about the App-V Command Line Hook Switch see the following article: How to launch processes inside the App-V 5.0 virtualized environment (KB2848278)
Assembling the Command Line Hook Switch can be tricky because it requires you to retrieve the package GUID and version GUID and concatenate them with an underscore in between. The full format looks like this: /appvve:<PACKAGEGUID_VERSIONGUID>.
To do this quickly, you can copy and run this single line of Powershell code:
$AppName = Read-Host "Enter package name"; If($AppVClientPackage = Get-AppVClientPackage $AppName) { Write-Host ("App-V Command Line Hook Switch:`n/appvve:" + $AppVClientPackage.PackageId + "_" + $AppVClientPackage.VersionId) } Else { Write-Host "Package not found." }
Result
 |
| Powershell Script to assemble the App-V Command Line Hook Switch |
Copy the last line of the output and add it as a parameter to your application shortcut.
For more information about the App-V Command Line Hook Switch see the following article: How to launch processes inside the App-V 5.0 virtualized environment (KB2848278)
New Tab Page in Internet Explorer displays Black Background
Symptoms
- The page for a new tab ("Frequent") displays a black background.
- On a server you might experience group policy settings related to internet security zones not being applied correctly.
- Zone icons might be displayed with a lock icon in front (prior to Internet Explorer 11).
 |
| Internet Explorer New Tab Black Background |
Cause
I discovered the cause on our Remote Desktop Server / Citrix XenApp 6.5 environment was that the (mandatory) profile was missing theme related registry settings. This profile was created by copying the default user profile or a new user without enabling a theme for this user first.Solution
The solution was to configure a Windows Aero / Basic theme for the template user before copying or converting it into a mandatory profile. |
| Internet Explorer New Tab Regular Background Color |
References
Other suggested solutions include:- Add the missing registry keys related to the Windows theme manually, through a logon script or Group Policy Preferences. [1]
- Change to and fro a different theme. [2]
- Reset Internet Explorer settings to defaults.
- Disable Internet Explorer Enhanced Security Configuration (IE ESC) before installing the Desktop Experience Feature of Remote Desktop Services.